Table of Contents
- Getting Into Home Automation and Home Assistant
- Using Home Assistant for Automation
- Enter Node-RED
- A Simple Tutorial
- Creating The Trigger
- Conclusion
Getting Into Home Automation and Home Assistant
During the recent pandemic, it seemed like everyone was picking up a new hobby, and I was no exception. While I’d made some progress toward converting my home into a smart home by using a collection of smart devices, I didn’t have any real cohesion between the different systems I was using. My light switches were Lutron Caseta, my yard lighting was Phillips Hue, my garage door opener was myQ, etc., etc.
Each of these systems had its own benefits, and some degree of control for automation and scheduling, but I had scripts and rules in as many places as I had apps on my phone. The only time the elements could be combined was if the individual vendors supported integrations. For example, while my Hue lights could be controlled by my Harmony remote control, my Tuya string lights could not, because Harmony never implemented a Tuya integration.
Enter Home Assistant: Home Assistant is an Open-Source home automation platform that supports thousands of devices and brands, often without dependency on the cloud, and brings them all together into a single system, allowing you to create automations, dashboards, voice commands, and mobile UIs and notifications. Rather than having to try and connect different device ecosystems through direct integrations, you can connect everything into Home Assistant and manage it there.
Home Assistant isn’t your only option here, I got my start with Samsung SmartThings, Apple has the Home App, Google has Google Home, and Amazon has Alexa. In addition, Open-Source alternatives exist such as HomeBridge and Hubitat. I was drawn to Home Assistant because it offers a wide range of options for integrations and a strong community of developers that keep adding support for new integrations. Home Assistant can also talk to Google Home, Alexa, and Apple Homekit, meaning you can use the voice assistant of your choice to control your home, even if the devices in your home aren’t supported by that voice assistant (for example, I have Nest thermostats and a Nest Doorbell that I can use with Apple Home even though Apple Home doesn’t support Nest, but that’s another blog entry for another day).
There’s plenty of content on how to get started with Home Assistant, and while I may write some in the future, for now, I want to jump ahead to actual automations.
Using Home Assistant for Automation
Even without adding a single automation to Home Assistant, you can still benefit from implementing it, because it allows you to create dashboards to control your home devices and to interface it with your voice assistant of choice to control devices hands-free.
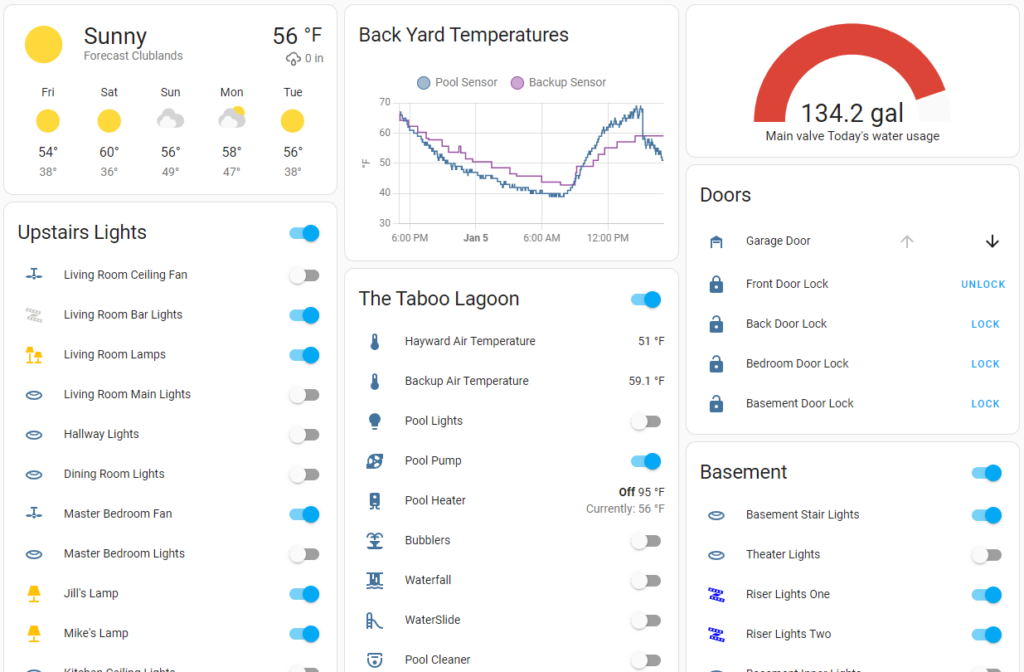
There’s nothing better than laying in bed and realizing you left the light on, just to call out “Hey Siri, turn off the lights.” without having to get back out of bed.
Well, there’s one thing better: not having to do anything at all. The automation capabilities of Home Assistant make it possible to create all kinds of automations, from motion-triggered lighting to automations that run based on the time of day or sunup/sundown.
For example, I currently run automations that include:
- Turning on and off a cooling fan in my AV cabinet when the equipment in the cabinet is turned on or off.
- Turning on and off the floodlights around the outside of my house based on my cameras detecting motion.
- Turning on the light in my garage whenever the garage door opens.
- Closing my garage door and locking all the doors to my house when everyone leaves.
- Turning off the exterior lights at sunrise and turning them on at sunset.
These automations are pretty straightforward to configure, here’s an example of the automation for turning on the light when my garage door opens:
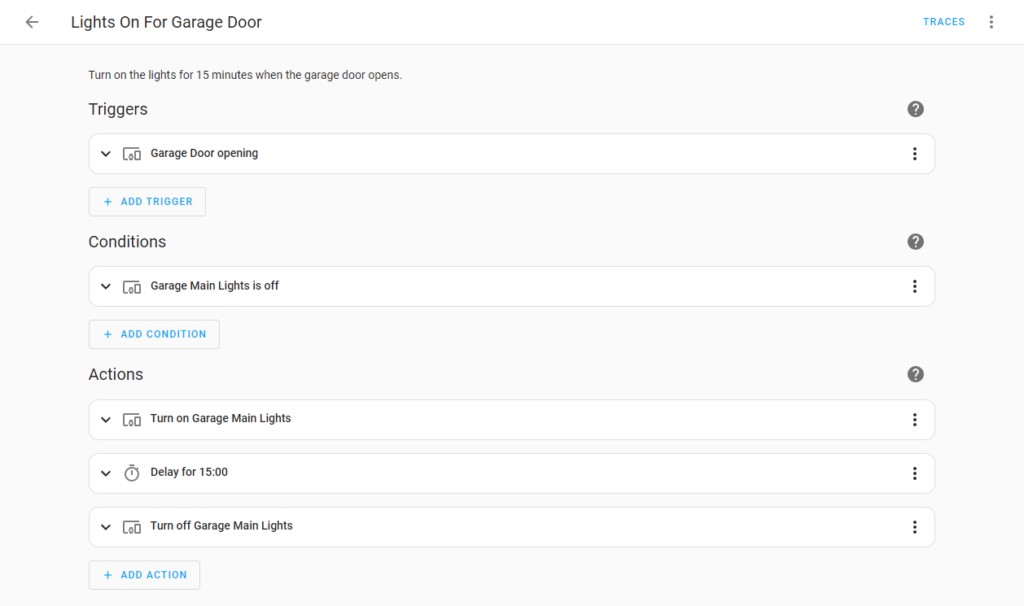
Automations in Home Assistant are pretty straightforward: first, you define a trigger that activates the automation, then you add any conditions that affect whether the trigger is used, and finally, you define a set of actions.
Triggers can be a variety of things, including sensor readings (such as activating when the temperature goes below a certain level), time of day, human actions, or changes in device state (like when a switch is turned on or off).
Conditions are optional but can be useful when you don’t always want to act when the trigger is fired. In the example above I skip processing the automation if the garage light is already on (because I likely had it on for a reason and don’t want it turning off automatically later).
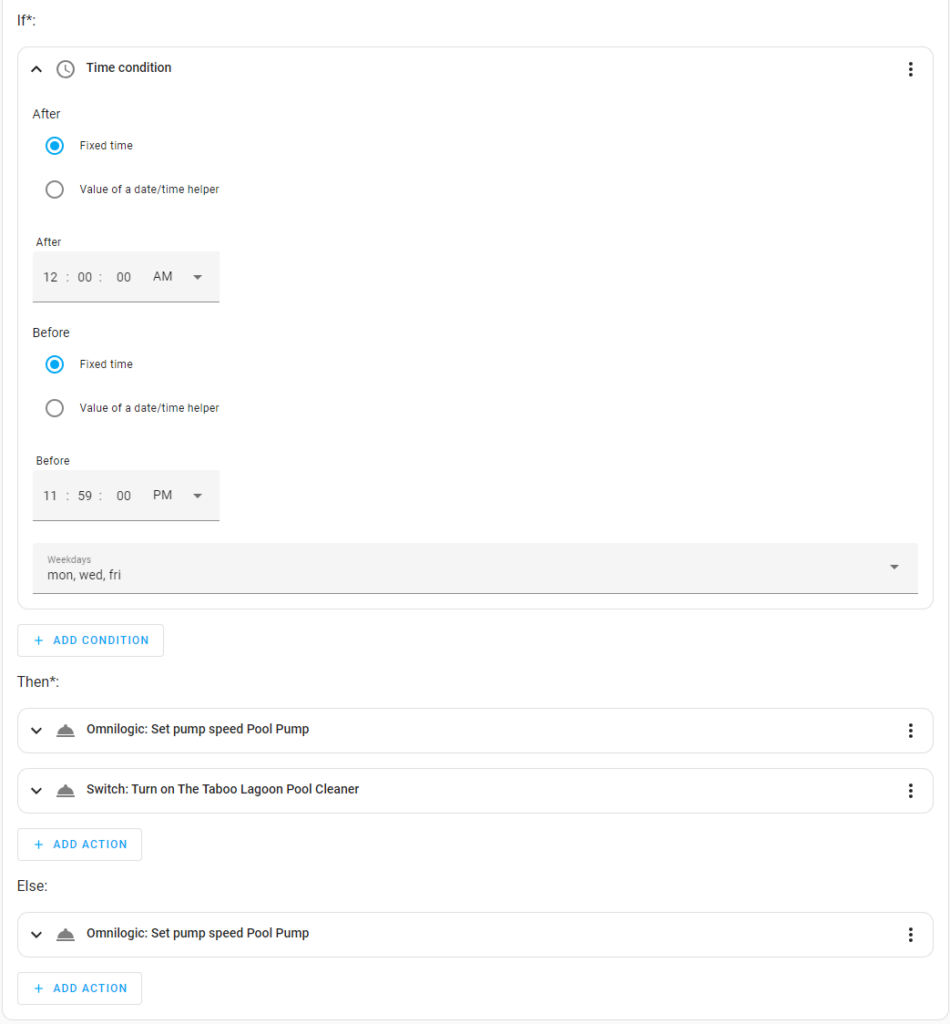
Actions are where automation makes your life easier, allowing you to create a series of steps that can span a wide variety of things. Look at the example below for when Sunrise comes each morning:

In this automation, I trigger based on a time of 30 minutes after sunrise, then turn off my exterior lights, turn on a desk lamp, activate a scene (which serves as a macro to collect several different combinations of brightness and color for some interior lights), and turn on a pool pump to start filtering. An if condition at the bottom sets the pump speed up or down based on the day of the week.
All of that replaces having to get up, turn on the bedroom light, head to the hallway, turn on the hallway light, turn on the common area light on the way to the kitchen, then turn on the kitchen light before getting a cup of coffee.
While you can do a lot with the built-in automation capabilities of Home Assistant, it can be relatively limited. You can set multiple triggers, but each trigger will be interpreted independently of the other, creating a default OR logic that can only be refined through the use of conditions, which are treated as AND logic. There’s limited branching through IF conditions, such as in the example below:
While the automation system can be more flexible when using YAML instead of the editor, there are some inherent limitations in the implementation that can impact advanced use cases because fundamentally every native Home Assistant automation is a series of linear steps, and each step is generally independent of the previous step. Branching, looping, and passing information from one step to the next is difficult at best, and impossible in some use cases.
Even when something is merely cumbersome instead of downright impossible, you’ll be pushed out of the editor and required to write automations by hand in YAML.
This isn’t to say that the built-in automation capabilities are lacking for the average user, all of my initial automations were implemented in the editor without any YAML, and it’s possible for the average user to never reach the limits of the Home Assistant automation capabilities, but for those that want to go further (and stay mostly within an editor), there is an alternative.
Enter Node-RED
Node-RED exists independently of Home Assistant, but thanks to the modular nature of Home Assistant and its support for add-ons, Home Assistant users are able to quickly and easily install Node-RED and use it as part of their Home Assistant installation, but what is Node-RED? A short explanation can be found at Wikipedia:
Node-RED is a flow-based development tool for visual programming developed originally by IBM for wiring together hardware devices, APIs and online services as part of the Internet of Things.[2]
Node-RED provides a web browser-based flow editor, which can be used to create JavaScript functions. Elements of applications can be saved or shared for re-use.
Wikipedia article on Node-RED
You can read a longer history of Node-RED at How IBM’s Node-RED is hacking together the internet of things | TechRepublic, but in a nutshell, Node-RED provides a visual editor that makes designing automations much more intuitive, which provides significantly improved flexibility and capability compared to the built-in Home Assistant automation system.
A Simple Tutorial
I personally learn by doing, so let’s get started with Node-RED by means of a simple tutorial.
Our Automation
We’re going to take my earlier example of automating garage lights and implement it in Node-RED. To prevent scrolling here’s the automation again:
The steps here are simple:
- Trigger on the opening of the garage door. I have my myQ garage door opener integrated into Home Assistant, and there is a trigger available based on the door opening. This helps ensure that people can see clearly when they get out of the car to go into the house.
- Set a condition to only run the automation if the lights are already off. I learned this one from working in the garage with the lights on, then opening the garage door to get something, and having the lights shut off while I was still working in the garage. By adding the condition that the lights must already be off, I avoid having the automation shut off the lights prematurely.
- Turn on the lights in the garage. I have a Lutron Caseta switch controlling the overhead lights in my garage, integrated into Home Assistant, this makes it easy to control the lights via automation.
- Wait Fifteen Minutes. This gives people plenty of time to unload the car, tidy up, and get into the house. If this turned out to be too little time, separate motion-based automation turns the lights back on as the movement of people in the garage is detected.
With this, we can work on the basic steps of catching a trigger, making a decision, and taking some actions.
Installing the Node-RED add-on in Home Assistant
As I mentioned earlier, installing and configuring Home Assistant will be outside the scope of this tutorial, so I’m assuming you’re starting from a working Home Assistant install.
NOTE: Add-ons are not available if you have installed Home Assistant using the Container method, because add-ons are containers, and there's no support for containers within containers. While it's possible to manually configure a Node-Red container that runs beside your Home Assistant container, that install method is beyond the scope of this post. Instead see Installing Node Red in Docker for Home Assistant (jordanrounds.com) and then join me back here.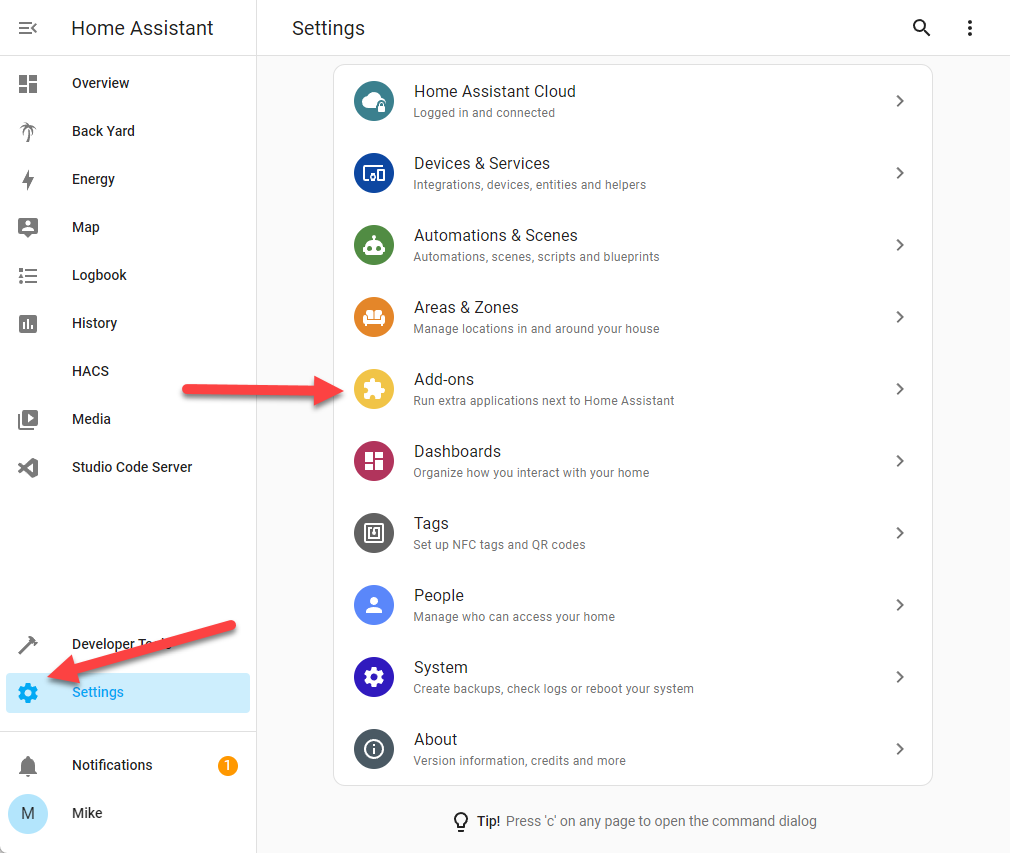
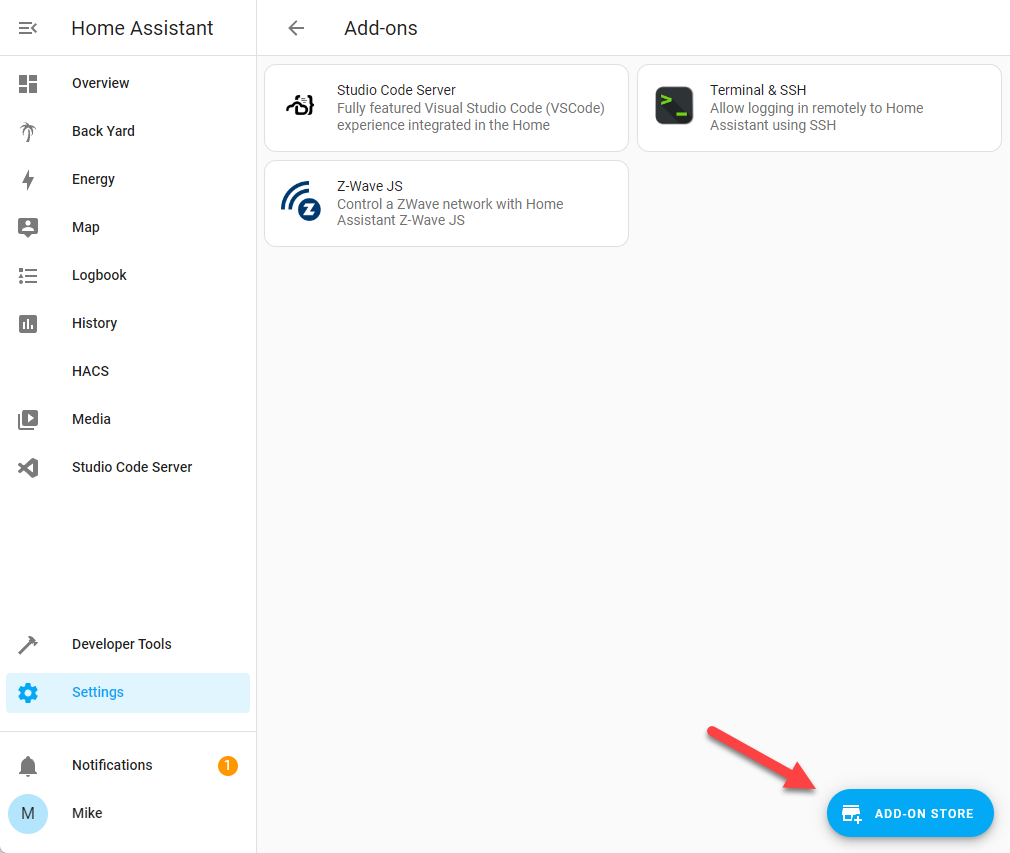
Start by going to Settings and choosing Add-ons. Any existing add-ons you are using will be displayed, along with a button at the bottom-right for the add-on store:
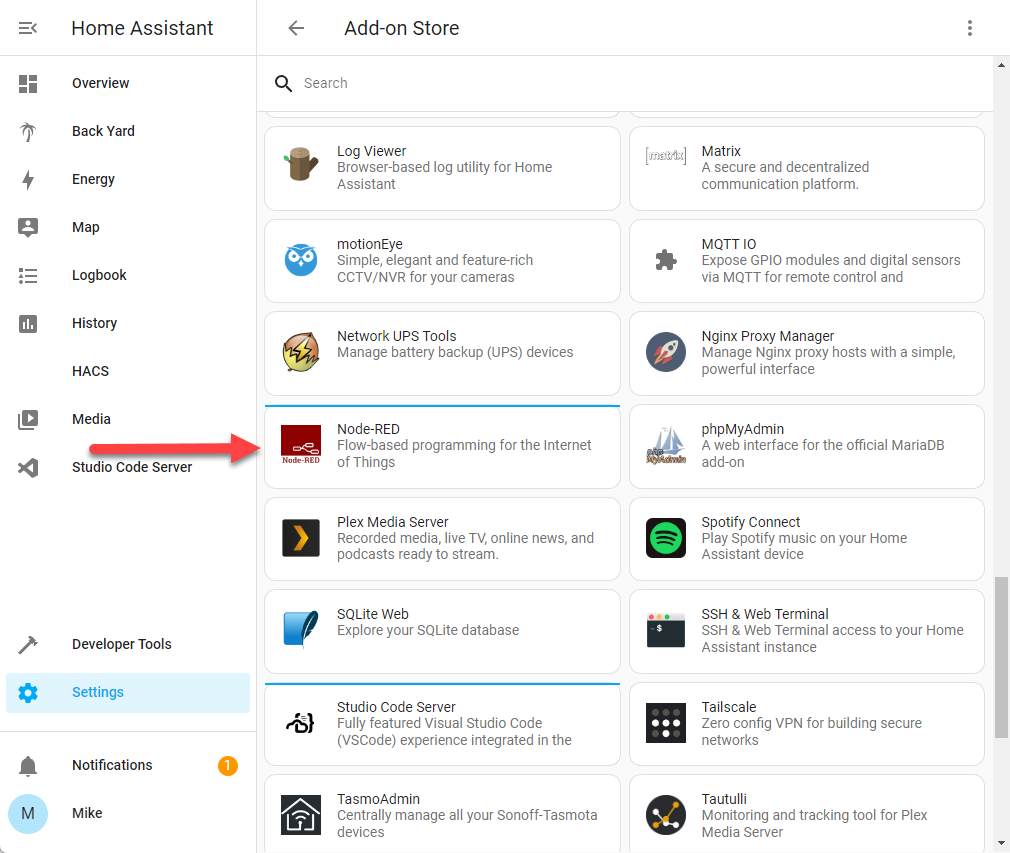
The add-on store will first list all of the official Home Assistant add-ons, meaning ones that have been incorporated into the official Home Assistant release, if you scroll down you should see a section titled Home Assistant Community Add-ons, and within that section an entry for Node-RED:
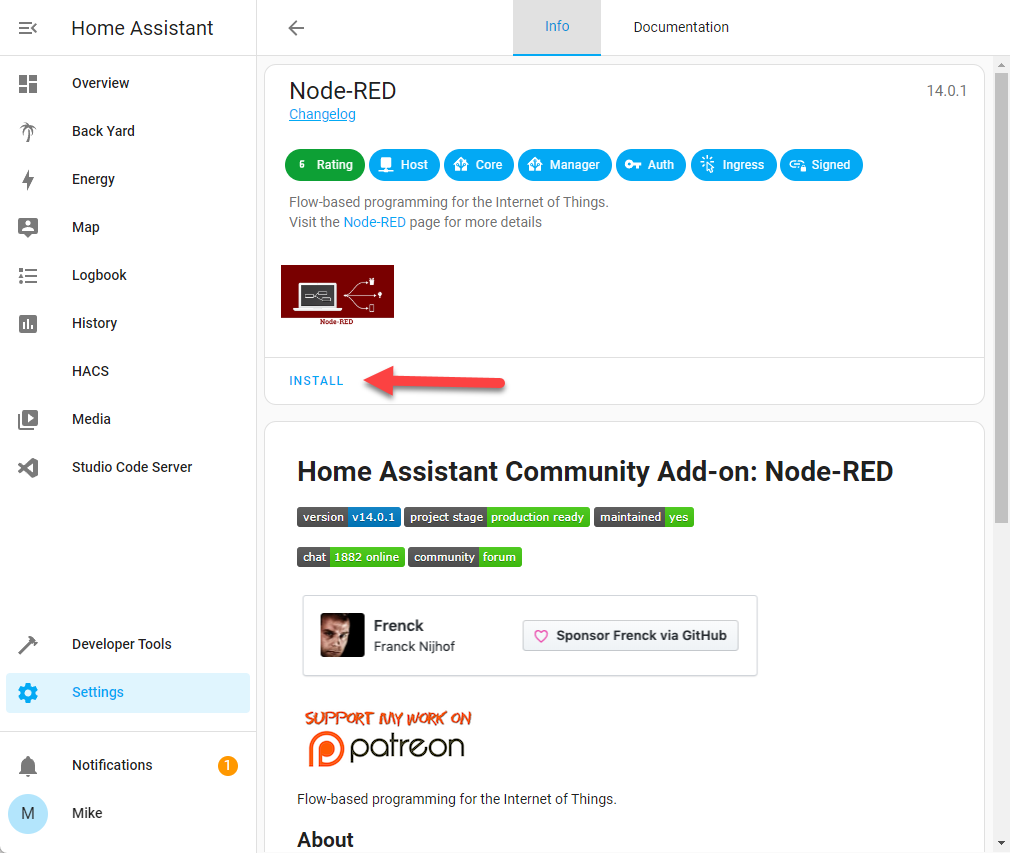
Clicking into the entry, you will see an option to Install the add-on:
The install will happen behind the scenes, and when it completes you will see a management screen in place of the install link:
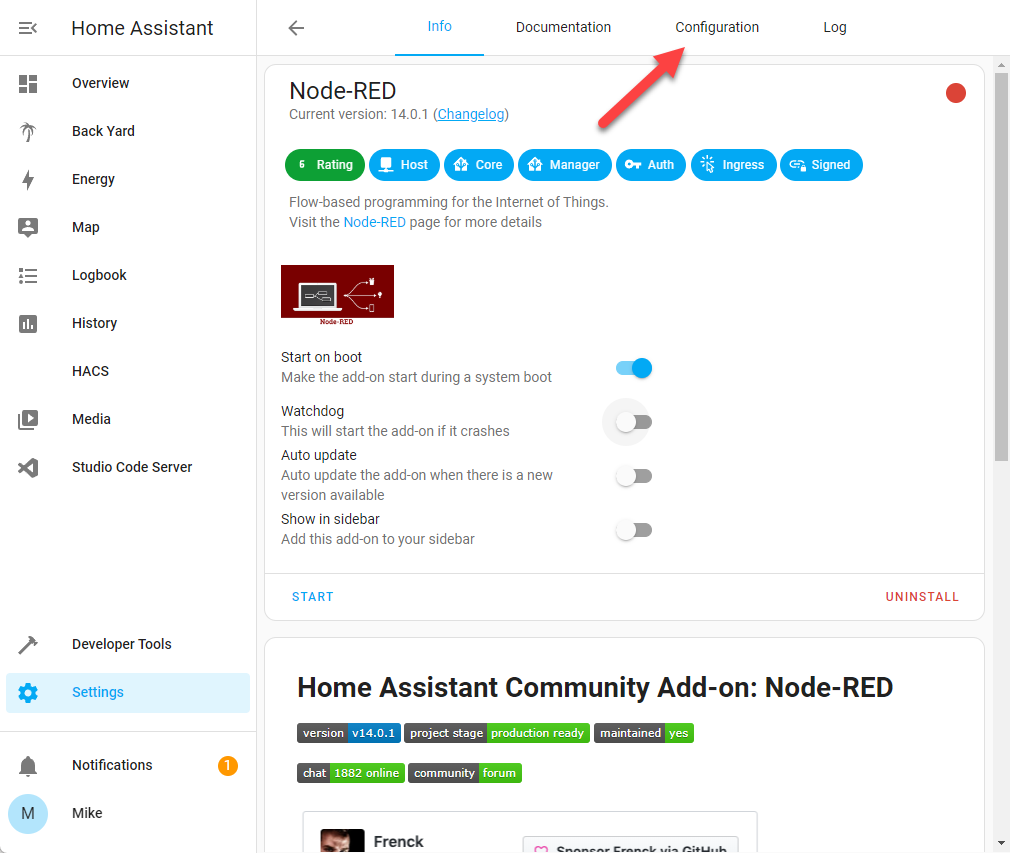
Click into the Configuration heading and look for the credential_secret option. The credential secret is an encryption key for your confidential data, set it to any string you prefer, similar to a password, and record the secret in a secure place in case you need it later.
Scroll down on the Configuration screen until you see the ssl option, deselect it, then click the Save link to save your changes, and go back to the Info tab.
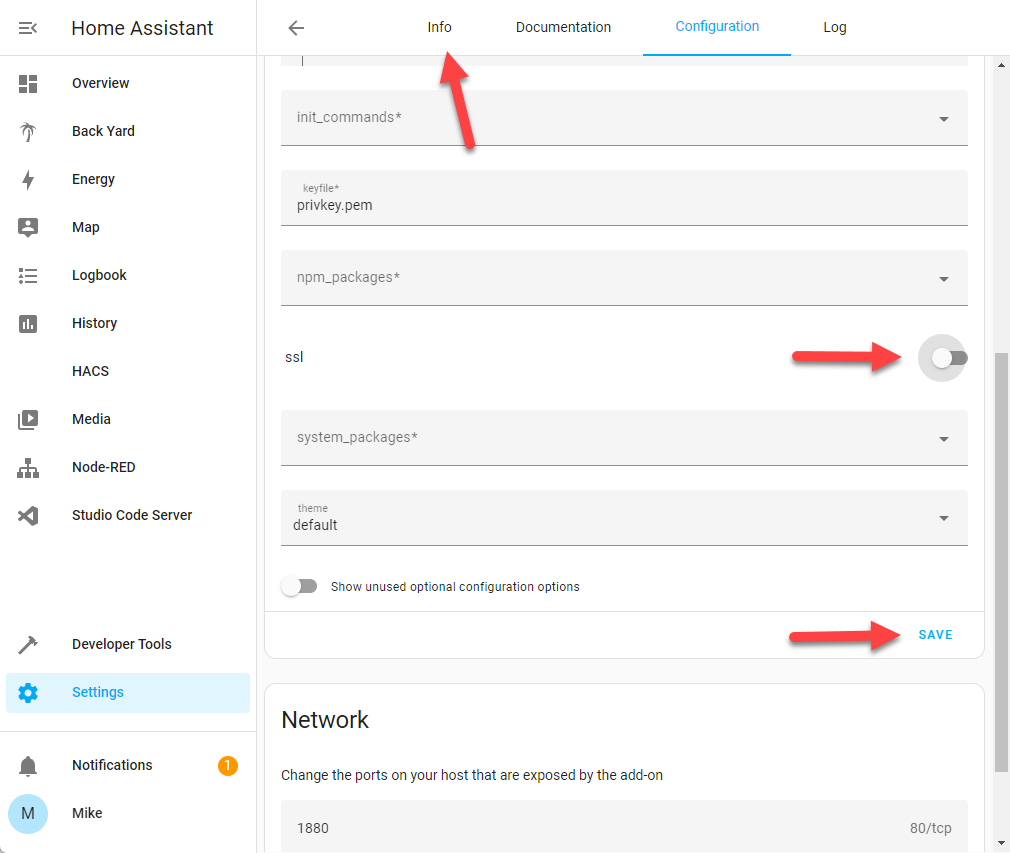
On the Info tab turn on Watchdog, Auto update, and Show in sidebar, click Start, and switch to the Log tab. Click REFRESH and you should see something similar to this:
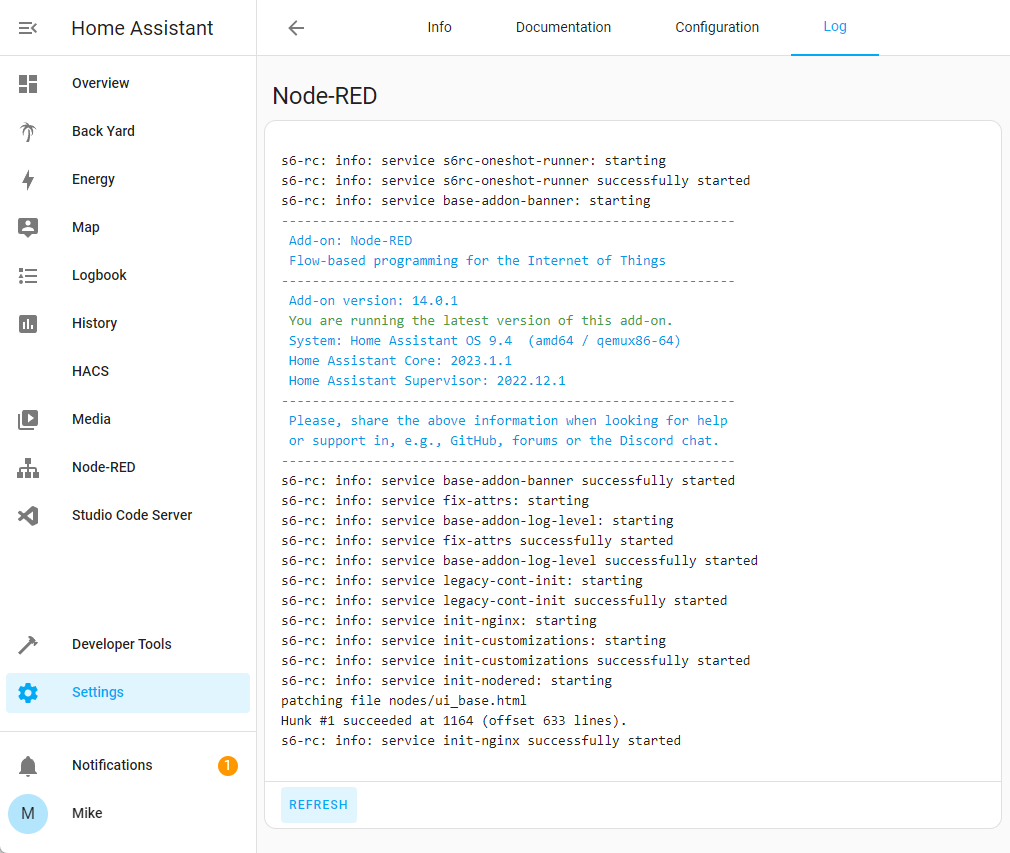
If you get red warning text, it’s likely you either did not save the credential_secret or did not turn off SSL. In this case, make the changes and choose Save again, and the system will prompt you to restart the add-on.
You should now have a working copy of the Node-RED add-on.
The Node-RED UI
If you selected Show in sidebar as one of your configuration options, you should now have a Node-RED entry that will bring up the Node-RED UI:
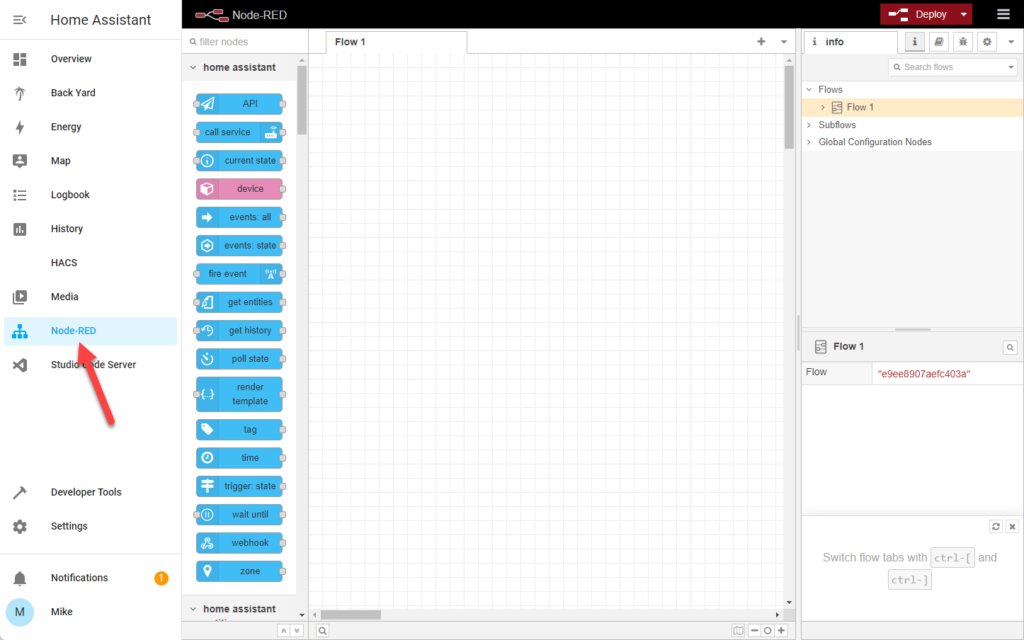
True to its name, Node-RED uses nodes for every part of an automation, connected together to form flows. The connecting lines represent messages between the nodes, and also show the path the flow will take to execute.
The left side of the Node-RED interface is the node palette, listing all the available node types by category. The center of the UI is the workspace, which is separated into tabs called flows, which contain sets of nodes connected by wires, which are also (confusingly) called flows. There can be more than one flow on a given tab, allowing you to group flows by purpose. The right side is the sidebar, which can show things like information on a selected element, debug data, help information, and common configuration and data elements.
Creating The Trigger
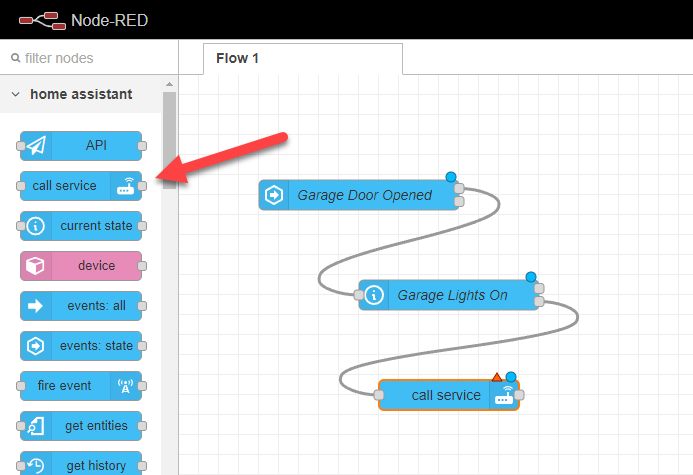
A flow has to start somewhere, and in our case, we’re going to implement the trigger from the example Home Assistant automation: the garage door opening. To catch the trigger, we need to look for a state change on the garage door device. To start, click and drag the events: state node onto the canvas:

You’ll notice we now have a node on the canvas, with a small blue circle and a red triangle in the top right. The blue circle indicates changes that have not been deployed, while the red triangle indicates errors present in the node.
Double-click the node to bring up its properties:
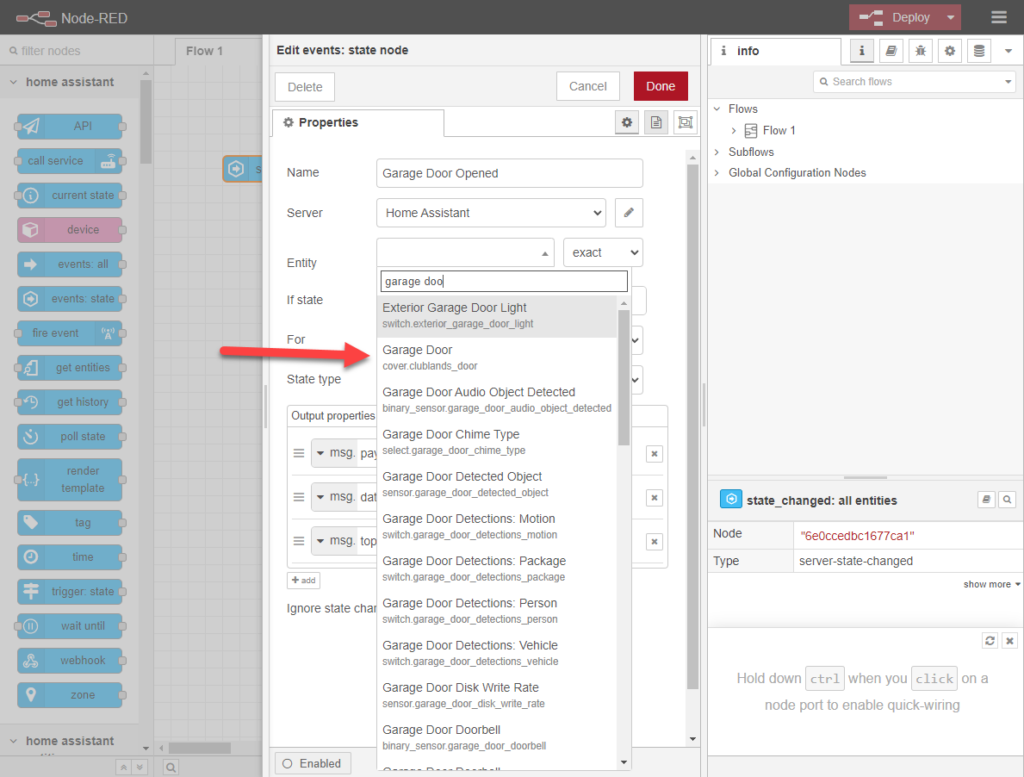
The event: state node catches every state change that happens in Home Assistant, so we need to narrow it down a little. First, I give the node a meaningful name, in this case Garage Door Opened, and filter down on the entity I’m interested in, in this case the cover.clublands_door entity that represents my garage door. For now, I’m using the exact match option, but I have additional options that allow me to monitor multiple entities at the same time.
Now that I’ve narrowed down the entity that I’m interested in, I need to filter which state I’m interested in triggering off of. While Node-RED can autocomplete the entity name, it can’t pull a list of states. This means that we have to determine the state from Home Assistant. Bring up the device in question in your settings, and look at its history:
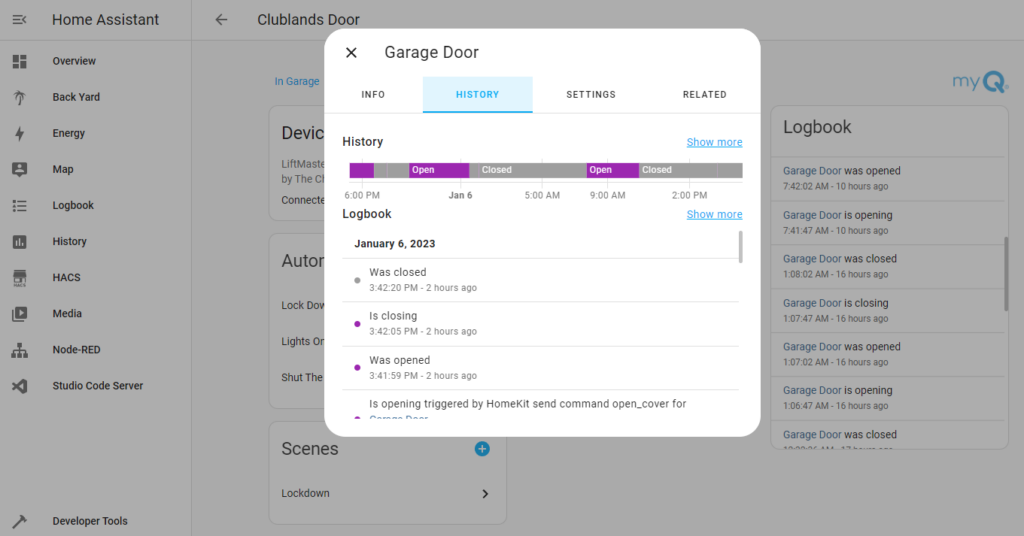
In this case, I can see that I’m looking for a state of opening as an indicator that it’s time to trigger my automation.
The If state property for an events:state node passes when the option evaluates to true, so in this case our comparison is that the state is opening:
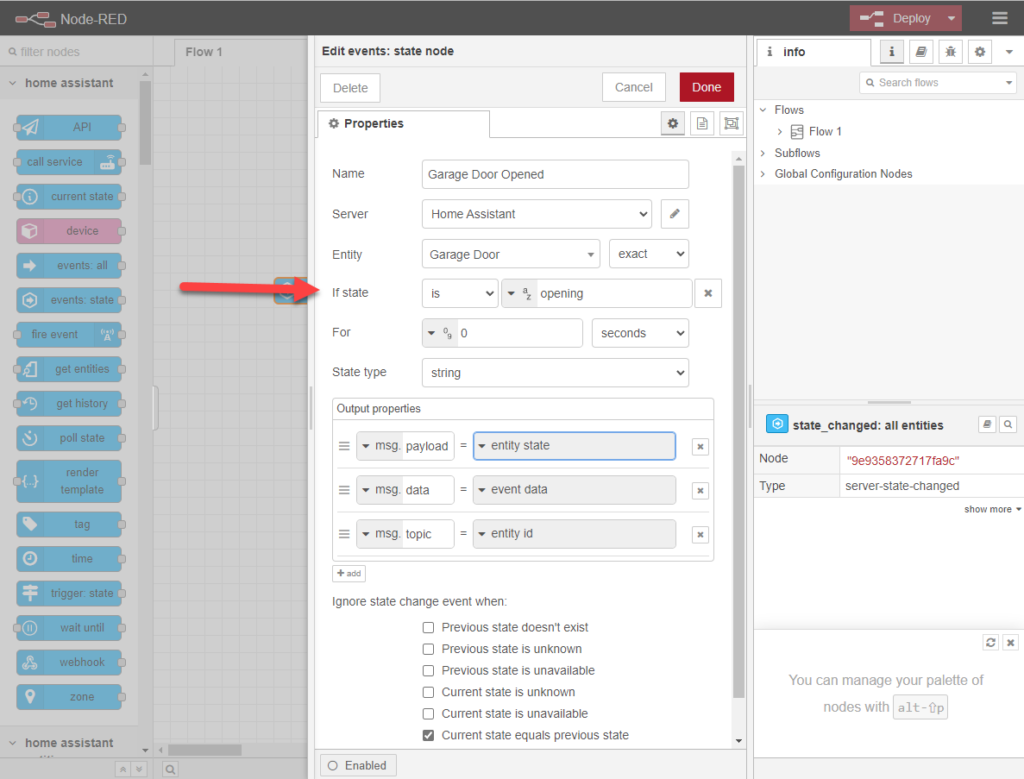
The remaining properties are a subject for a future post, where we want to pass information to the next node. For now, we’re just setting up a trigger that will need no context.
After clicking Done, you’ll notice the node has changed:
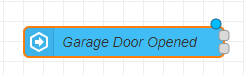
There are now two grey connectors instead of one. When you add an If state to the node, it creates a second connection point, where one fires if the state expression is true, and the other fires if the state expression is false. In the current example, we will only use the connector for when the state expression is true.
Evaluating The Condition
The next step in our sample automation was a condition based on whether the light is already on. This means we need to discover if the light is on and act accordingly.
To determine whether the lights are currently on or off, we use the current state node. Drag it onto the workspace:
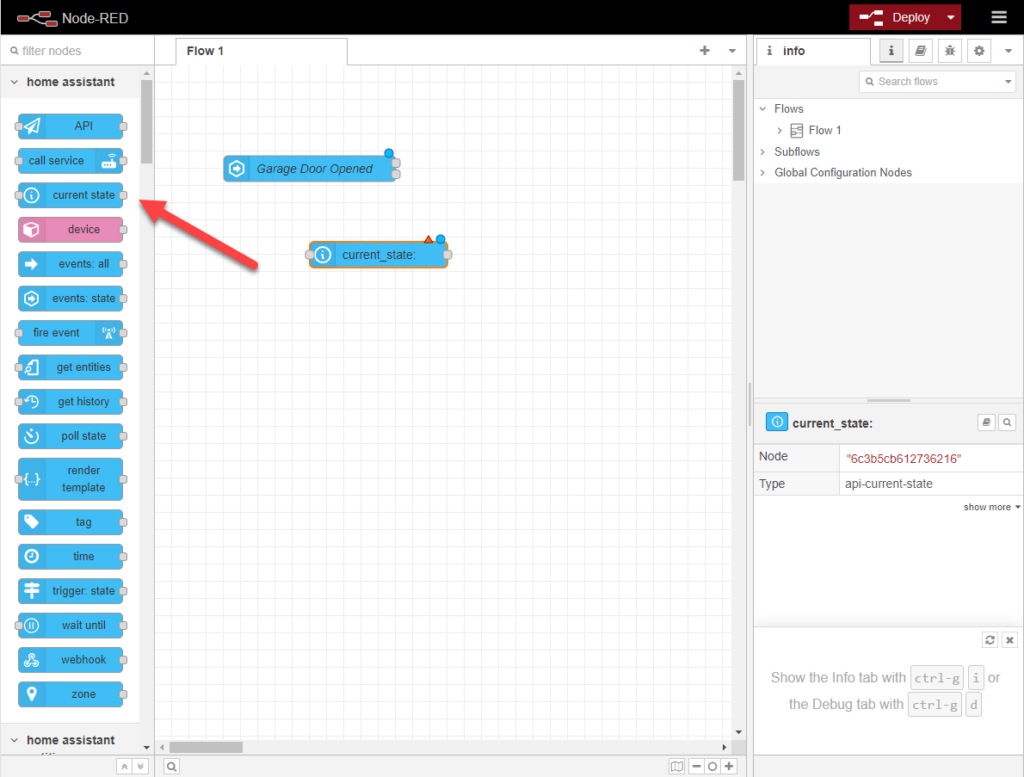
After adding the node, click and drag from the upper grey connector on the events: state to the current state node, this creates a wire that connects the nodes together:
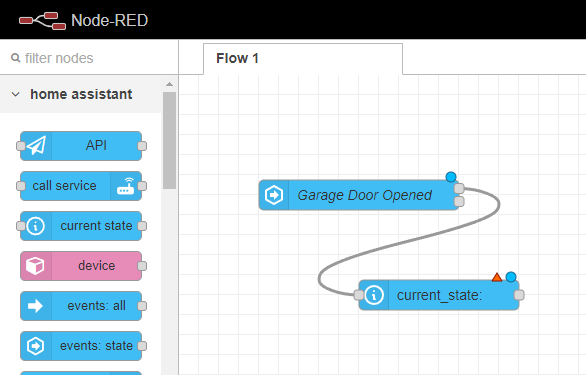
This now connects the current state node to the true output on the events: state node, and also passes the configured data in a message along the wire. In this example, we won’t be using that data since we’re only interested in the trigger, but that ability to pass data opens up new possibilities we can take advantage of in the future. For now, double-click on the current state node and let’s set some properties:
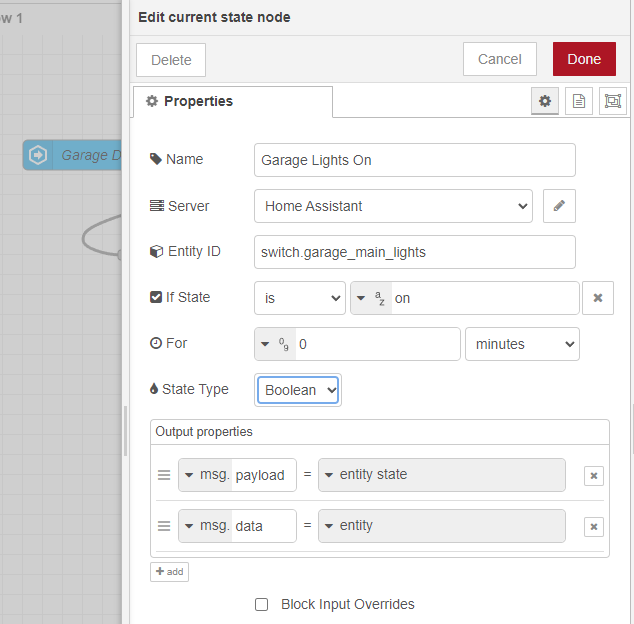
In this case, I’ve set the entity ID to that of my garage light switch and set the If state to on. When I click done the same change will occur to the node, with a second gray anchor added to represent a false outcome for the expression:
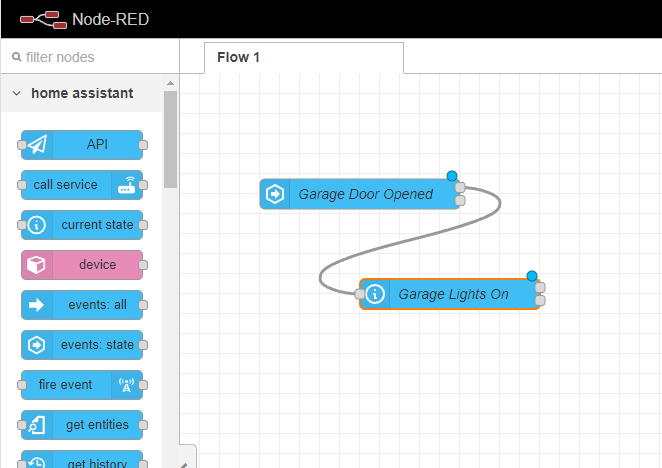
Connecting to the false connector will reproduce the condition from the example, where we only fire the automation when the lights are already off. Whether you check for on and connect to the false connector or check for off and connect to the true connector is up to you, just name the node accordingly.
Taking Action
With our condition in place, it’s time to implement our actions, in this case to turn on the lights. To turn on a light in Home Assistant we call a service, which means using the call service node. Drag it onto the workspace, and connect a wire from the false connector on the state node to the call service node:
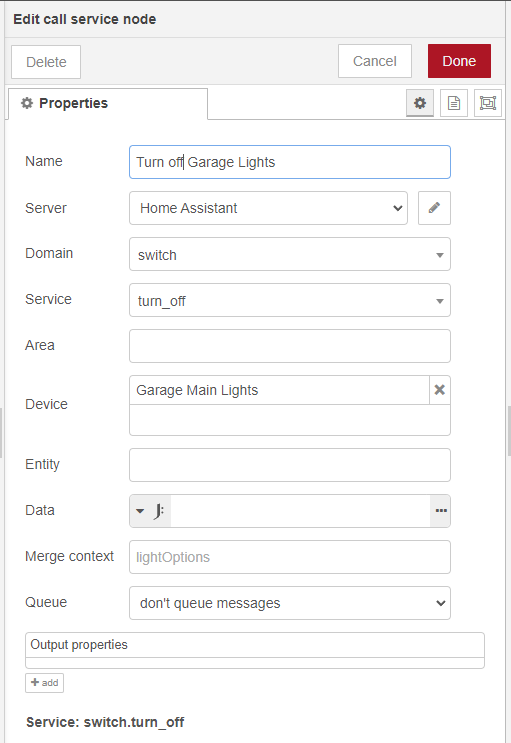
Once wired, double-click on the new node to set its properties:
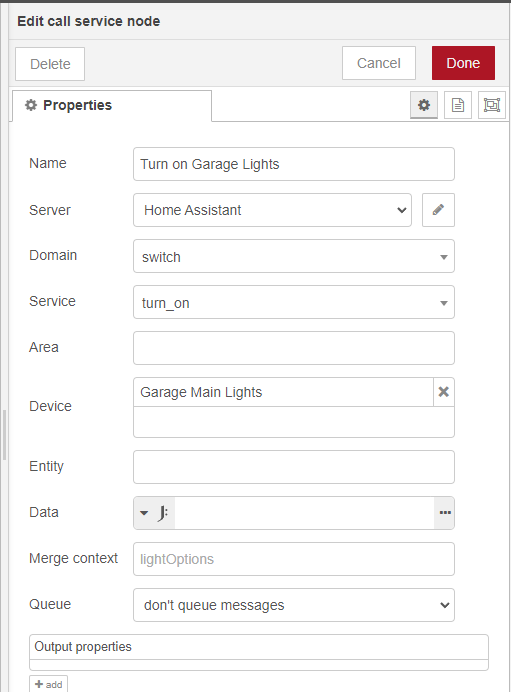
In this case, I’ve given it a descriptive name and selected the domain of switch. The domain can vary depending on whether the light in question is defined in Home Assistant as a light or a switch. In either case, the service is turn_on, and I’ve defined the device to be turned on. The domains, services, and devices are all pre-populated so you can take advantage of autocomplete to find the right ones. If I had multiple light or switch devices in my garage, I could also specify the area instead of the individual device. Always think about all the devices in a given area before using the area option, you can inadvertently deactivate something you didn’t mean to, such as when you have a camera in an area and there’s a switch entity for the camera that shuts off the feed.
The node doesn’t change when clicking done this time because the call service node has no branching.
Hurry Up and Wait
The next step in our action list is a fifteen-minute wait. Delays are implemented using the delay node, which is found by scrolling down the node palette to the function section (you can also use the filter nodes box to find it):
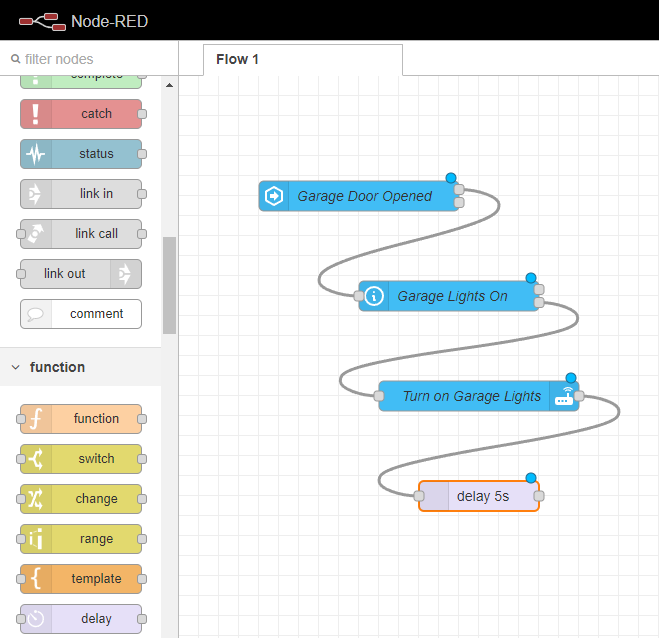
By default the delay is for five seconds, so double-click the node after wiring it to change the delay settings:
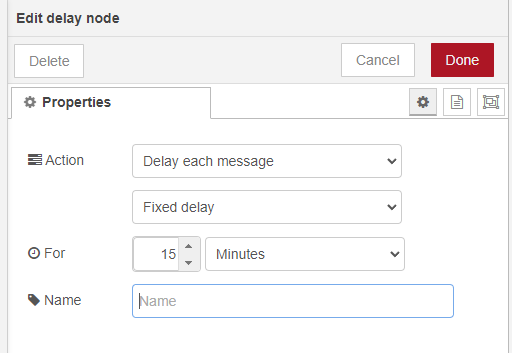
While you can name the node explicitly, the name is automatically updated based on the settings so we can leave the name blank.
To save time when configuring the turn-off action, you can select the Turn on Garage Lights node, right-click and choose copy, then right-click on the workspace and choose paste.
Wire the copied node to the end of the delay node and double-click to change its properties:
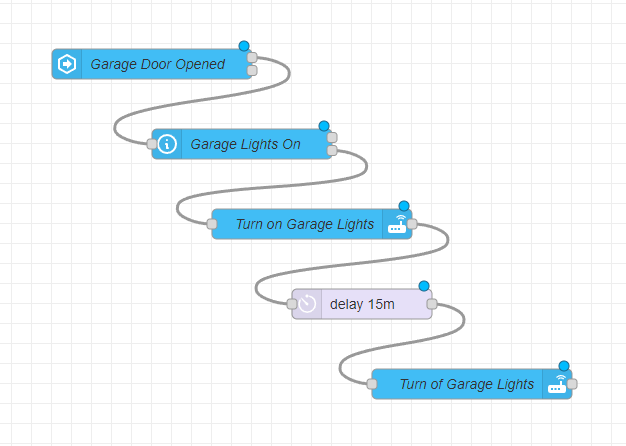
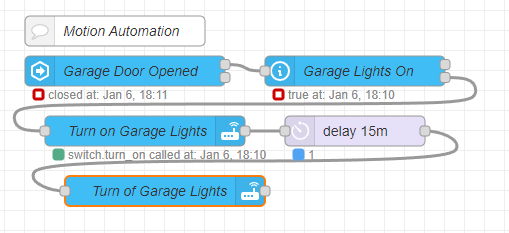
In this case, I changed the name of the node and changed the service from turn_on to turn_off. Our final flow looks like this:
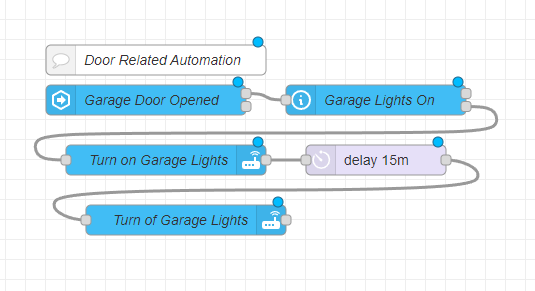
You can re-arrange the nodes, add comments, and rename the tab to suit your needs, even creating more compact versions of the flow such as this:
Deploying & Testing The Automation
Now that our flow is defined, we can deploy and test it. This is the easiest part of the tutorial, simply click the Deploy button in the top-right of the UI:
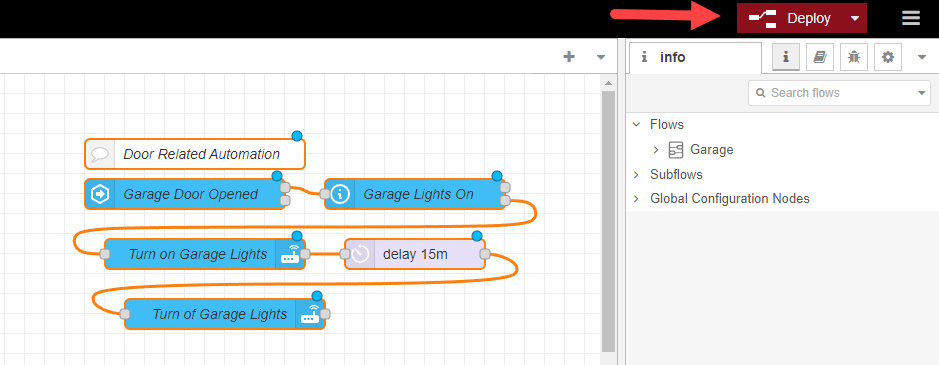
If everything goes well, you should see a popup announcing that your flow was successfully deployed:
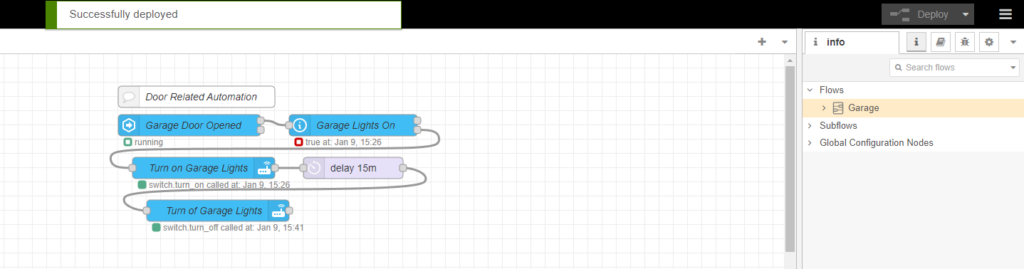
Note that the nodes in your flow no longer have a blue circle at the top-right, because your changes are deployed. Any edits you make, even in node positioning, will introduce a blue circle again, and you’ll need to deploy your changes again.
As for testing, the fun of home automation is that you get to go try it. Turn off the lights, open the garage door, and thrill in the victory of the lights coming on! Back on the Node-RED editor you can see the status information next to the nodes:
Conclusion
Hopefully this short tutorial on using Home Assistant and Node-RED helps you get started on your own automations, in a future post I’ll delve into debugging, passing data through messages, and some more advanced use cases.
Questions? Suggestions? Leave them in the comments below!